123 Street Avenue, City Town, 99999

(123) 555-6789

email@address.com


You can set your address, phone number, email and site description in the settings tab.
Link to read me page with more information.

WEST 5TH AT HOME

Check out my weekly blog that I update every three months!

Decor Inspo - The Partio

Emily Deisler

I love feeling inspired. People inspire me. Decorating inspires me. Heck, I've felt inspired looking at the color variations in a broken rock. My hope in life is to inspire others to create something they love, that will bring joy to their home. So I am starting weekly "Decor Inspo" posts, where I share a room with you that I am either designing for someone, with someone, or have dreamed up in my head. The goal is to hopefully inspire others in their home. Along with the design I will share where I found a few of the items, so you can recreate it and make it your own.


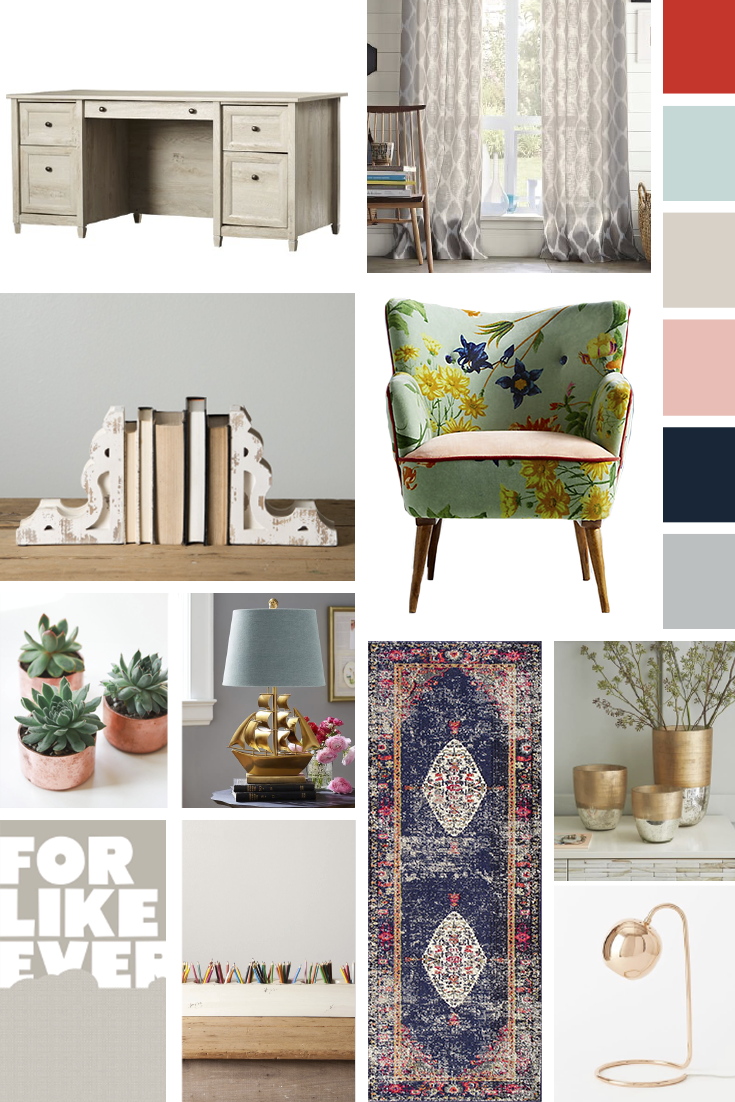
This weeks mood board is inspired by a recent trip to visit one of my most favorite people, in my home state of Michigan. Miss Lynds just bought the cutest house you'll ever see in Ann Arbor and we spent some time thinking about how to decorate her new abode. A little fact about the homeowner: she is the worlds best hostess. The kind of gal who will wake up before you and make you homemade pancakes - even though she is gluten free. She will be sure to have your favorite ice cream, go with you to hit up your favorite coffee spot, she is the salt of the earth. 

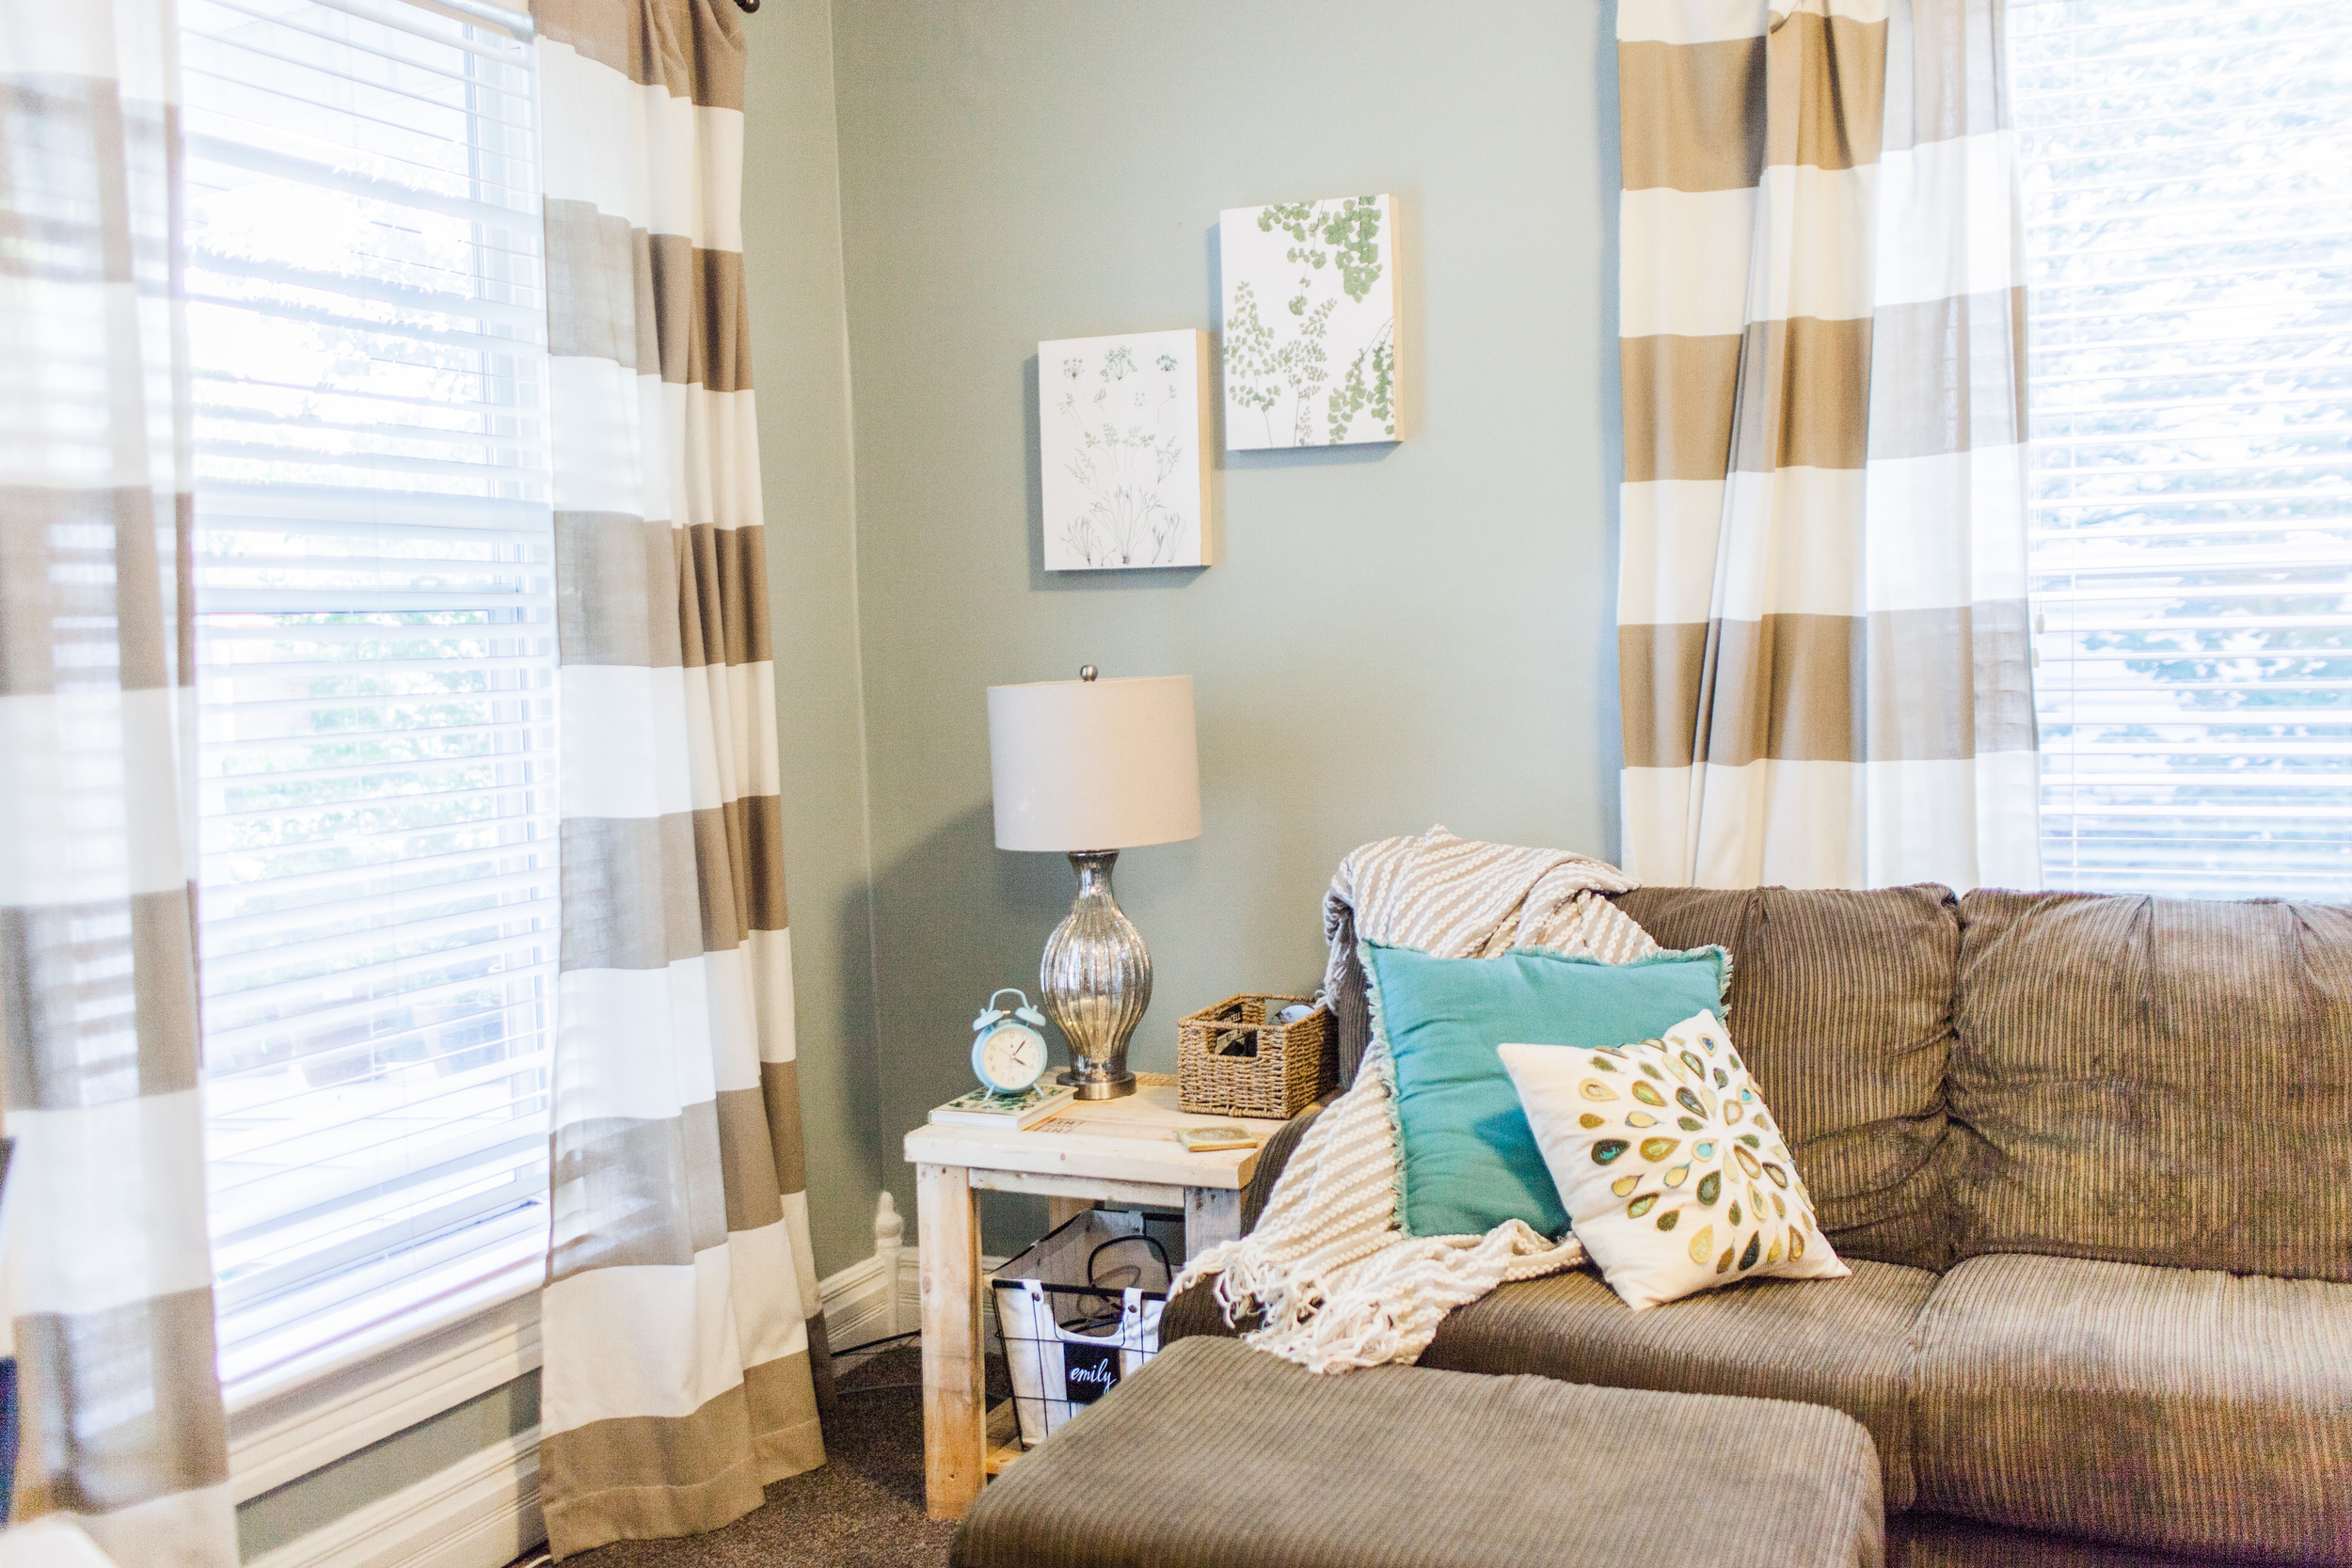
So when thinking about decor in her home, entertainment is key. The girl has a lot of friends. What better place to start than her patio? There is nothing like a Michigan summer and no better place to enjoy it than the "partio". Party patio - I thought it was clever. Let's make it a thing.

Setting the Mood

When thinking about the decor for the partio I wanted to focus on being fun and lighthearted with the feel of chillin' on Lake Michigan. Where people could go and feel comfortable and be surrounded by friends. Of course we had to hide in the maize and blue. I wanted things to look casual and colorful, like you could spill your lemonade and not be worried about getting thrown out. So take a look and let that summertime vibe wash over you!


Have a space you would like help gathering inspiration for?

email ME with your project to have it featured on the blog!


Links from left to right.

  1. Tan Rug, Blue Rug
  2. Overhead Light
  3. Table Tennis
  4. Ratan Couch
  5. Pillow 1, Pillow 2
  6. Drum Stool 1, Drum Stool 2, Wicker Pouf
  7. Beverage Cooler
  8. Hammock
  9. Pineapple Bottle Opener
  10. Yellow Conversation Set
  11. Umbrella
  12. Plates
  13. Garden Tools

Moodboard Monday - Office for an optimist

Emily Deisler

I love feeling inspired. People inspire me. Decorating inspires me. Heck, I've felt inspired looking at the color variations in a broken rock. My hope in life is to inspire others to create something they love, that will bring joy to their home. So I am starting "Moodboard Monday's", where I share a room with you that I am either designing for someone, with someone, or have dreamed up in my head. The goal is to hopefully inspire others in their home. Along with the design I will share where I found a few of the items, so you can recreate it and make it your own.


I love color. It's pry the closest thing I have to a sixth sense. Don't get me wrong, neutrals are so gorgeous and hot right now - you can't go wrong in that family. But because there are so many amazing designers out there (cough* Jo Jo) doing neutrals so well, I will be keeping my mood boards colorful and punchy. 

I love the energy color brings to a room and the way it effects the mood and creativity of the people in it. My natural tendency in our home has always been in the blue/green family. I like people to feel relaxed and comfortable. My walls are painted in different shades of blue and pops of green are carried throughout the decor. I like it to flow room to room. You know where the flow stops though? Inside the office of West 5th. The ceiling is pink, colorful artwork lines the walls, and I've just added a newly refinished turquoise painted dresser. It's loud and inspiring and I love it. So when working on a project to design an office space for a special lady with a girl boss personality, that concept came to mind. Letting the decor in the office give a sneak peak into her personality. I wanted the color to be unique as her but still professional and inviting for her clientele. 

Setting the Mood

This mood board was created to be feminine, professional, and a little shabby chic. It was originally developed for a professional office space but I adapted it slightly for a home office, craft room, or even bedroom with a little extra work. Like light and airy? Paint the walls a light grey, or sea salt blue. Want something more dramatic and bohemian? Choose a navy or indigo swatch with lots of copper and mirrored accessories. 


Note: For all my ladies out there ballin' on a budget, there are alternative links available in addition to pricey items pictured in the mood board. Reality is, what's cutest usually isn't what's most affordable. We work hard for that money, so we can't blow it all on an accent chair. 

moodboard_office.png

Have a space you would like help gathering inspiration for?

email ME with your project to have it featured on the blog!


Links from left to right.

  1. Desk, Budget friendly desk, my favorite trick - find one thats used and paint it!
  2. Curtains
  3. Bookend
  4. Accent chair, Budget friendly chair
  5. Copper planter
  6. Ship table lamp, Budget friendly lamp
  7. Rug, Pink Rug
  8. Vase
  9. Poster
  10. Storage
  11. Task lamp

Parade of Homes

Emily Deisler

This past year I started something new. It started with a gift I made for my sweet sister in law a few years ago. I painted a watercolor illustration of their first home, something cutesy and simple. 

firsthomepainting

I fell in love with the idea from the beginning. To capture the life a home represents and then getting to see the joy it brought the couple to display it. I then made one for my sister, then my mom, then my cousin... you get the idea. I realized I had something that I wanted to do, and set out to make it happen. 

Custom watercolor home illustrations made their way into the West 5th shop and I have been blessed with painting homes across America since. So I pulled together some of my favorite homes from the past few months for a round up. Gather the kids, your wifey, or your pup and take a grand tour of West 5th's first ever Parade of Homes!!!

Starbucks optional. Snacks necessary. Mini van not required. 
Have a favorite?  Want your own? Leave a note in the comments below! 

Moodboard Monday - The B's Room

Emily Deisler

I love feeling inspired. People inspire me. Decorating inspires me. Heck, I've felt inspired looking at the color variations in a broken rock. My hope in life is to inspire others to create something they love, that will bring joy to their home. So I am starting "Moodboard Monday's", where I share a room with you that I am either designing for someone, with someone, or have dreamed up in my head. The goal is to hopefully inspire others in their home. Along with the design I will share where I found a few of the items, so you can recreate it and make it your own.

To kick-off this new idea I will be sharing a moodboard I designed for my dear friend Rachael. Rachael has two adorable girls that are so full of life and energy, and she wanted to design a new bedroom for her daughters. Rachael is also a designer, so this project was especially fun because we fed off each others creative juices! 

Kids room are my absolute favorite interiors to decorate. You can do so many things that adults would find to be "too much". Just because we grow up doesn't mean things need to look boring... but that topic could be a whole different blog post. My philosophy- if you like it, it's never too much, bring on the color and texture! I wanted a space that matched their personalities, and was fun for them to live in, and would match their level of energy.

As someone who grew up sharing a room with her sisters, I know how special it can be. My mom was an interior designer and always decorated it to fit our tastes perfectly. I wanted to make sure the design coordinated, but each of "the B's" had elements unique to themselves. Hopefully this can inspire a room in your home! 


moodboard1

Have a space you would like help gathering inspiration for?

email ME with your project to have it featured on the blog!


Links from left to right.

  1. Butterfly Chair
  2. Coral Quilt
  3. Gingham Duvet
  4. Chalk Paint
  5. Wall Mirror (different than pictured)
  6. Flamingo Sheets 
  7. Arrow Curtains or make your own! Fabric
  8. Honeycomb Wall DIY
  9. Monogram Hook

Pet Portrait Illustration

Emily Deisler

I have always loved animals. I'm that person who sees a dog walking down the sidewalk and audibly yells "AAAWWWWEEEEEE" while coming to an abrupt stop, and slowly melts on to the sidewalk as her coffee mug clanks and rolls down the street.. Now take this amusing mental picture and imagine all those feelings being expressed through paint. Wowza. That's a lot of feels.

Meet the latest addition of goods to West 5th,  watercolor pet portraits. 

Blue_frame.jpg
Magnolia_frame.jpg
Olive_frame.jpg

So if you have someone in your life obsessed with their cat (cough, Adlai, cough).  I would love to help you bring a smile to their face by capturing their best friend in print. 

Love to send notes? This listing also includes a set of 8 notecards!

THE ILLUSTRATION PROCESS

  1.  First, go over to the shop.
  2. Checkout, selecting the perfect package for you.
  3. During checkout you will fill out a form with any additional text you'd like to include on the print. Name, dates, quote, you name it. We can accommodate up to two lines of text. Please specify if you have a desired font style - print or script.
  4. Once your order is complete, send an email that includes photos of the pet. Know the drawings will be made from the photo, so make sure there is a great shot of the face! (west5thcreative@gmail.com)
  5. After the painting is complete, we'll email you a PDF proof to make sure all text is approved.
  6. Once approved, we print and ship to you! Printed on 100 lb natural cover paper.

Click the links below to check out in the shop!

Pet Portrait Illustration

Pet Portrait Illustration + Notecards

Rush loves posing for inspiration in the studio.

For now, Rush and I will hangout in the studio fighting the summer heat and waiting anxiously for the fun to begin.

Not an animal lover? West 5th has something for homeowners too. Check out my house illustrations here

Home Portrait Illustrations

Emily Deisler

Home is where it all starts. The memories, the relationships, the moments that make us who we are. My love for art started in a home full of creativity that helped to grow and foster that love. Years later I've found a love of capturing homes in watercolor, because they represent so many years of memories for people.

This post is to show a new item I have in the shop, custom home portraits. A great memory for you, or gift idea for others.


Based on a photo of your home, each portrait is drawn by West 5th owner, Emily Deisler. The houses are traced in pencil, color is added through watercolor painting, and finished off with accent pen and ink. This process captures a fun and whimsical illustration of your home.

THE DESIGN PROCESS

  1.  First, select your print size in the shop. We offer 8"x10" or 11"x14".
  2. During checkout you will fill out the information you'd like to include at the bottom of the print. Address, family name, dates... you name it. We can accommodate up to two lines of text. Please specify if you have a desired font style - print or script.
  3. Once your order is complete, send an email that includes photos of the house. A front view of your home (or business!) is required. (west5thcreative@gmail.com)
  4. After the drawing is complete, we'll email you a PDF proof to make sure all text is approved.
  5. Once approved, we print and ship to you! Printed on 80 lb matte fine art paper.
  6. Notecards and additional prints are available upon request, just shoot me an email for a printing quote (west5thcreative@gmail.com). 

* Please allow up to two weeks to receive your proof. Print will ship 1 to 3 days after proof is approved.

* Contact us if you have any special requests, we also have large format printing available.

Feeling inspired for your  home? Come on in and shop here!


Beach Waves Baby

Emily Deisler

I really love hair. Easy to switch up, it’s my favorite way to express my style. I like many cuts and looks, and have tried most of them. The look I always come back to is classy-meets-a-little-bit-of-a-hot-mess. While this is intended to be a home blog, who doesn’t want to be feeling cute while they do a little decorating on a Saturday morning? So here is an illustrated post on how to get messy beach waves, because I can draw better than I can take pictures.


WASH

You can start with a good wash the night before, spray with a leave-in conditioner, brush, and let it air dry. I prefer this method because my hair holds curl best when it’s not freshly blown dry. A little bit of oil goes a long way, so just sleep on it!

prep.jpg

PREP

Your results will be best with straight ends, so if your hair is wavy I recommend doing a quick pass through with the straightener. The leave-in conditioner I use has a heat protector in it, but if yours doesn’t spritz with a heat protector spray. Great hair starts with healthy hair!

My hair is very thick and has a coarse texture that holds curl well. If your hair is fine or thin I recommend spritzing with a salt spray to help give it some grit. This will also prevent your strands from slipping on the curling wand barrel. 

SECTION & WRAP

Put half your hair up, and start with the bottom half. This style is created by waving sections in opposite directions. Grab a section about an inch in width. Wrap the hair away from your face to start.

For short hair, go around the wand once or twice. For long hair, you can wrap around 1-3 times. Always leave roughly 2 inches at the end, away from the wand or iron. Don’t curl the ends at all. I only add a few curls overall to the bottom layer. With short hair, most of what is underneath is hidden.

Now reverse the direction of how you wrap your hair, and wrap towards your face. Switching up which way you wrap, along with how many times you wrap is what gives it variety and body. Also vary where you start wrapping the curls, whether it be at the root or halfway down the section of hair. The more you switch it up, the more variety your curl will have - creating a natural wave look.

Continue this process on the top section until you’ve reached your desired amount of curl. 

PLAY & SPRAY

Once I am done curling, I add shine serum to the ends of my hair. It helps catch light on the texture while also making the ends look healthier. Give your roots a shake and run your fingers through the big curls. Never us a brush! When done playing with your locks, finish with a little hairspray. I like a flexible hold so the curls fall over time, and your hair isn’t stiff.


Voila! You are looking fresh. With a little dry shampoo and touch-ups your efforts should last for a couple days. You can see the products I use by shopping the links below. No sponsors here - just the goods I’ve found work for me.

You can leave any questions or comments below!

A little #beachwave how to on the blog tomorrow. Because messy hair is fun. #shorthair #choppybob

A video posted by Emily Deisler (@west5thcreative) on


Gesso Board Prints

Emily Deisler


Nothing says "I am full of possibility!" like a blank wall, a rare find in my house do to a lack of not being able to leave walls alone. I set out wanting to fill out a focal wall in my living room, without spending a lot of money. I knew I wanted to add a pop of color, and based on the layout of the living area I felt something symmetrical would look best. The space already had a calm, relaxing vibe, so I felt nature inspired decor would hit the spot. The following post is my DIY solution, for under $50!


WHAT YOU'LL NEED

  • 4 Gesso Boards (or any smooth hard board)

  • Matte Mod Podge (glossy works too if you have it)

  • Paintbrush or small foam roller

  • Smoothing item (such as a roll of tape)

  • 4 Matte art prints, 80 lb paper or higher (I used 100 lb 12"x 16" for my project) 

  • Scissors, or xacto knife for trimming


Start this easy DIY project by first gathering your materials. I am going to share the items I used with you, but know that you can adjust the materials to suit your needs. For example, I purchased my 12x16 gesso boards from Hobby Lobby, but feel free to purchase whatever size you desire. I found mine in store with a 2" depth, which make the prints dynamic enough not to need a frame.  Also, at the bottom of the post you can download the artwork I printed, but feel free to utilize art prints that you like. At West 5th I want to inspire people to find and express their personal style and be confident in it.

I purchased all materials at my local Hobby Lobby and Lowe's Home Improvement store.

  • Begin this project by either downloading the art prints located at the bottom of this post, purchasing them here , or collecting your own images to use in the collage.

  • Print your imagery. I recommend printing on 80 lb paper or higher, to prevent wrinkling or tearing when applying the print to the board. Also, I preferred the look of matte paper because it will not cause a glare when light reflects off your image. Leaving it always in view! If you don't have a printer available, prints can be made at your local printer, or office supply store.

  • Trim your prints to the same size as your boards, in this case 12x16. Start by grabbing one print and one gesso board.

  • Lay your print on top of the board to ensure you have the right size, it will be much easier to trim now than later.

  • Next, paint the Mod Podge on the back of your art print as well as your gesso board, working swiftly to prevent the Mod Podge from drying. I prefer to use the roller over a paint brush, but the paint brush will add a nice handmade texture.

  • Now place the art print on top of the gesso board, artwork facing up. Begin in one corner, working your way across the board, smoothing and adjusting to prevent any wrinkles. Constantly check to ensure the artwork hasn't bubbled or wrinkled, using an object to rub it out when needed. Once the print is smooth across the board, apply another coat of Mod Podge. 

  • Allow roughly an hour to dry, and then apply another coat of Mod Podge across the front. Once this second coat is dry, you are done! Feel inspired to make it your own by painting the sides of the board a fun color, or adding a stenciled monogram to the front. Repeat this process with all remaining boards.

lr_2.jpg

Botanical 12x16 prints


This is my first DIY post, and I would love to know if anyone tries this out in their home! Feel free to comment below or follow me on social media. Use hashtag #west5thathome!